js运算优先级

优先级表[20(高)=> 0(低)]

优先级 运算类型 关联性 运算符
20 圆括号 n/a(不相关) ( … )
19 成员访问 从左到右 … . …
19 需计算的成员访问 从左到右 … [ … ]
19 new (带参数列表) n/a new … ( … )
19 函数调用 从左到右 … ( … )
19 可选链(Optional chaining) 从左到右 ?.
18 new (无参数列表) 从右到左 new …
17 后置递增(运算符在后) n/a …++
17 后置递减(运算符在后) n/a …--
16 逻辑非 从右到左 ! …
16 按位非 从右到左 ~ …
16 一元加法 从右到左 + …
16 一元减法 从右到左 - …
16 前置递增 从右到左 ++ …
16 前置递减 从右到左 -- …
16 typeof 从右到左 typeof …
16 void 从右到左 void …
16 delete 从右到左 delete …
16 await 从右到左 await …
15 从右到左 … ** …
14 乘法 从左到右 … * …
14 除法 从左到右 … / …
14 取模 从左到右 … % …
13 加法 从左到右 … + …
13 减法 从左到右 … - …
12 按位左移 从左到右 … << …
12 按位右移 从左到右 … >> …
12 无符号右移 从左到右 … >>> …
11 小于 从左到右 … < …
11 小于等于 从左到右 … <= …
11 大于 从左到右 … > …
11 大于等于 从左到右 … >= …
11 in 从左到右 … in …
11 instanceof 从左到右 … instanceof …
10 等号 从左到右 … == …
10 非等号 从左到右 … != …
10 全等号 从左到右 … === …
10 非全等号 从左到右 … !== …
8 按位异或 从左到右 … ^ …
7 按位或 从左到右 … | …
6 逻辑与 从左到右 … && …
5 逻辑或 从左到右 … || …
4 条件运算符 从右到左 … ? … : …
3 赋值 从右到左 … = …
3 赋值 从右到左 … += …
3 赋值 从右到左 … -= …
3 赋值 从右到左 … *= …
3 赋值 从右到左 … /= …
3 赋值 从右到左 … %= …
3 赋值 从右到左 … <<= …
3 赋值 从右到左 … >>= …
3 赋值 从右到左 … >>>= …
3 赋值 从右到左 … &= …
3 赋值 从右到左 … ^= …
3 赋值 从右到左 … = …
2 yield 从右到左 yield …
2 yield* 从右到左 yield* …
1 展开运算符 n/a ... …
0 逗号 从左到右 … , …

原理typeof

typeof

typeof基本判断

类型 结果 描述
Undefined “undefined”
Null “object” 最初实现中,object标签为0,Null的标签为0x00, 所以null被误认为object
Boolean “boolean”
Number “number”
BigInt “bigint”
String “string”
Symbol “symbol”
宿主对象 取决于具体实现
Function对象 “function” 除 Function 外的所有构造函数的类型都是 ‘object, Number
其他任何对象 “object”

运算优先级

异常

在 let 和 const 声明之前,对一个变量使用 typeof 会抛出 ReferenceError,块作用域变量在块的头部处于 暂存死区

1
2
3
4
5
6
7
8
9
10
typeof undeclaredVariable === 'undefined';

typeof newLetVariable; // ReferenceError
typeof newConstVariable; // ReferenceError
typeof newClass; // ReferenceError

let newLetVariable;
const newConstVariable = 'hello';
class newClass{};

例外

所有浏览器都存在 typeof document.all === undefined

原理instanceof

原理instanceof

instanceof会检查原型链(proto)属性上存不存在类的prototype属性

1
2
3
4
5
6
7
8
9
10
11
12
13
14
15
16
17
18
19
20
21
22
23
24
25
26
27
28
29
30
function instanceOf(L, R) {
let O = R.prototype;
L = L.__proto__;
while(true) {
if(L === null) {
return false;
} else if (L === O) {
return true;
} else {
L = L.__proto__
}
}
}

class Car {
constructor(color) {
this.color = color;
}
}

class Cruze extends Car {
constructor(color) {
super(color);
}
}
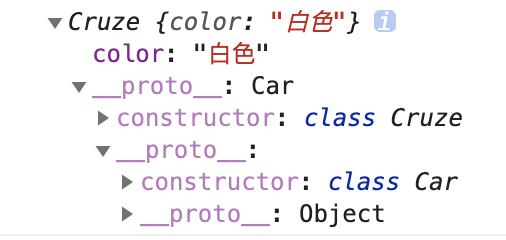
const cruze = new Cruze("白色");

console.log(cruze); // Cruze { color: '白色' }
console.log(instanceOf(cruze, Cruze)); // true
console.log(instanceOf(cruze, Car)); // true

ES5继承实现

ES6版本继承

1
2
3
4
5
6
7
8
9
10
11
12
13
14
15
16
17
18
class Car {
constructor(color) {
this.color = color;
}

static yideng = "京城一灯";
}

class Cruze extends Car {
constructor(color) {
super(color);
}
}
const cruze = new Cruze("白色");

console.log(cruze); // Cruze { color: '白色' }
console.log(cruze instanceof Cruze); // true
console.log(cruze instanceof Car); // true

  1. 实例cruze的是class Cruze,

ES5继承

1
2
3
4
5
6
7
8
9
10
11
12
13
14
15
16
17
18
19
20
21
22
23
24
25
26
function Car(color) {
this.color = color;
}
Car.myname = "京城一灯";
Car.prototype.x = function () {
console.log("父类方法");
};

function Cruze(color) {
Car.call(this, color);
}

Cruze.prototype = Object.create(Car.prototype, {
constructor: {
value: Cruze,
writable: false,
},
});

Object.entries(Car).forEach(([key, value]) => {
Cruze[key] = value;
});
const cruze = new Cruze("白色");
console.log(cruze);
console.log(cruze instanceof Cruze);
console.log(cruze instanceof Car);

PHP

安装

XAMPP

修改配置文件

.bitnami/stackman/machines/xampp/volumes/root/etc

httpd.conf

命令

1
sudo apachectl restart

安装

安装XAMPP

  1. 停止mysql
  2. proftpd

/Applications/XAMPP/xamppfiles/etc/proftpd.conf中添加

1
2

DefaultAddress 192.168.31.36

先安装composer

1
2
3
4

curl -s http://getcomposer.org/installer | php

mv composer.phar /usr/local/bin/composer

进入web目录,在终端执行

1
composer global require "fxp/composer-asset-plugin"

创建目录

1
2

composer create-project --prefer-dist yiisoft/yii2-app-basic yii

换源

配置只在当前项目生效

1
2
3
4
composer config repo.packagist composer https://mirrors.aliyun.com/composer/

# 取消当前项目配置
composer config --unset repos.packagist

配置全局生效

1
2
3
4
composer config -g repo.packagist composer https://mirrors.aliyun.com/composer/

# 取消全局配置
composer config -g --unset repos.packagist

YII启动

1
2
php yii serve --port=8888

1
2
3
4
5
6
7
8
9
10
11
12
13
14
15
16
CREATE TABLE `books` (
`code` CHAR(11) NOT NULL PRIMARY KEY,
`name` CHAR(250) NOT NULL,
`author` CHAR(250),
`publisher` CHAR(250)
) ENGINE=InnoDB DEFAULT CHARSET=utf8;

INSERT INTO `books` VALUES ('01','JavaScript高级程序设计','司徒1','北京邮电出版社1');
INSERT INTO `books` VALUES ('02','你不知道的JavaScript','司徒2','北京邮电出版社2');
INSERT INTO `books` VALUES ('03','JavaScript设计模式与开发实践','司徒3','北京邮电出版社3');
INSERT INTO `books` VALUES ('04','CSS揭秘','司徒4','北京邮电出版社4');
INSERT INTO `books` VALUES ('05','CSS世界','司徒5','北京邮电出版社5');
INSERT INTO `books` VALUES ('06','WebKit技术内幕','司徒6','北京邮电出版社6');
INSERT INTO `books` VALUES ('07','Node.js:来一打 C++ 扩展','司徒7','北京邮电出版社7');
INSERT INTO `books` VALUES ('08','深入浅出Node.js','司徒8','北京邮电出版社8');
INSERT INTO `books` VALUES ('09','HTML5 Canvas核心技术图形动画与游戏开发','司徒9','北京邮电出版社9');

补码反码

原码

正数的源码是他本身(0+其他位),负数的源码是1+其他位, 如图 在4位二进制中,第一位表示符号,其他位表示数的二进制

正数 二进制 负数 二进制
0 0000 - -0 1000
1 0001 - -1 1001
2 0010 - -2 1010
3 0011 - -3 1011
4 0100 - -4 1100
5 0101 - -5 1101
6 0110 - -6 1110
7 0111 - -7 1111

当两个值相加时

普通数字相加 二进制数字相加
(+1)+(+2)=(+3) 0001+0010=0011
(+0)+(-0) = (-0) 0000+1000 =1000
(+1) + (-1) = (-0) 0001+1001 = 1010

存在问题

  1. 0分正负
  2. 相反数相加为-0
  3. 如果存在(+2) + (-3) = -1
普通数字相加 二进制数字相加 实际值 正常二进制
(+2)+(-3)=(-1) 0010+1011=1101 -5 1001

因此在计算时

  1. 两位数相加,先判断符号,同号加法,异号减法

反码

  1. 正数的反码,仍是本身,负数的反码,对真值取反,符号位保持不变
正数 反码:二进制 负数 反码:二进制 负数 源码:二进制
0 0000 - -0 1111 - -0 1000
1 0001 - -1 1110 - -1 1001
2 0010 - -2 1101 - -2 1010
3 0011 - -3 1100 - -3 1011
4 0100 - -4 1011 - -4 1100
5 0101 - -5 1010 - -5 1101
6 0110 - -6 1001 - -6 1110
7 0111 - -7 1000 - -7 1111
  1. 当两数反码相加
普通数字相加 二进制数字相加
(+1) + (-1) = (-0) 0001+1110=1111 正确
(-1)+(-3)=-5 1110+1100=1010 错误

所以:反码不能用于运算

补码

正数的补码等于它的原码;负数的补码等于反码+1

正数 补码:二进制 负数 补码:二进制
0 0000 - -0 0000
1 0001 - -1 1111
2 0010 - -2 1110
3 0011 - -3 1101
4 0100 - -4 1100
5 0101 - -5 1011
6 0110 - -6 1010
7 0111 - -7 1001
-8 1000

补码中不存在 0 应为 1111 + 1 = 10000为五位,溢出。 -8 = 1000

普通数字相加 二进制数字相加
(+1) + (-1) = (-0) 0001+1111=10000 = 0000 正确
(-1)+(-3)=-5 1111+ 1101 = 11100 = 1100 正确

实际计算机中,多用补码运算

原理解析

在时钟运算中,一圈为12小时,当在6点时 减去 3小时 为 3点,那么加上 (12 - 3)小时 也是 15点,也是3点,也就是说(12-3)为6的同余数

则称 12 为 模, 3 与 9 互补

这样就将 -3 的减法变成了 +9的加法

同样将 二进制中,如果数值位数为 4位,第一位代表符号,那么 模 就为 2^3 也 就是 8

-3 的 同余数为 (8 - 3) = 5, 源码为 0101,再补上符号位 1101
-1 的 同余数为 (8 - 1) = 7 ,源码为 0111, 再补上符号位 1111

两数相加为 11100,取四位 1100,

其他基础计算

n & ( n -1 ) 可以消掉最后一个1

n & 1 可以判断最后一个位是0还是1

Paste Image

1. Paste Image

MarkDown 编辑时粘贴图片处理

安装 Hexo

npm install hexo-simple-image

在写markdown时用相对路径

在外部_config.yml中 开启post_asset_folder: true

1.1. 常用变量

变量 名称
${currentFileName} 当前文件名
${currentFIleNameWithoutExt} 当前文件名
${currentFileDir} 当前文件夹目录
${projectRoot} 项目跟路径

1.2. 常用操作

操作 快捷键
复制图片 Command + Alt + V

常用配置

配置项 作用 常用配置
Base Path 图片地址 ${currentFileDir}
Default Name 图片名称 Y-MM-DD-HH-mm-ss
Path 图片插入地址 ${currentFileDir}/${currentFileNameWithoutExt}
Prefix 前缀 ./

mermaid笔记

安装

安装 VSCode

安装插件

Hexo支持mermaid

  1. yarn add hexo-filter-mermaid-diagrams

  2. 在主题中的_config.yml中添加

1
2
3
4
mermaid:
enable: true # Available themes: default | dark | forest | neutral
theme: forest
cdn: //cdn.jsdelivr.net/npm/mermaid@8/dist/mermaid.min.js
  1. 在主题找到资源加载文件layout/_partial/head.ejs添加代码
1
2
3
4
5
6
7
8
<% if (theme.mermaid.enable) { %>
<script src="<%= theme.mermaid.cdn %>"></script>
<script>
if (window.mermaid) {
mermaid.initialize({ theme: '<%= theme.mermaid.theme %>' })
}
</script>
<% } %>

类图

1
2
3
4
5
6
7
8
9
10
11
12
classDiagram
class 动物{
特点1:能动
特点2:能叫
}
class 狗{
特点1:4条腿
特点2:会汪汪叫
特点3:可爱至极
汪汪叫(陌生人)
}
动物 <|-- 狗

参考资料:

http://lightzhan.xyz/index.php/2020/05/10/markdown-mermaid-tutorial-2/

http://lightzhan.xyz/index.php/2020/04/06/markdown-mermaid-tutorial/

jest-debugger

jest 配置 vscode 断点调试

方式一 使用 vscode 调试

  1. 安装 jest
  2. 配置 launch.json
1
2
3
4
5
6
7
8
9
10
11
12
13
14
15
16
17
18
19
20
{
// 使用 IntelliSense 了解相关属性。
// 悬停以查看现有属性的描述。
// 欲了解更多信息,请访问: https://go.microsoft.com/fwlink/?linkid=830387
"version": "0.2.0",
"configurations": [
{
"name": "Debug Jest Tests",
"type": "node",
"request": "launch",
"runtimeArgs": [
"--inspect-brk",
"${workspaceRoot}/node_modules/.bin/jest",
"--runInBand"
],
"console": "integratedTerminal",
"internalConsoleOptions": "neverOpen"
}
]
}

方式二 使用浏览器调试

配置 package.json 命令

“debugger”: “node –inspect-brk ./node_modules/jest/bin/jest –runInBand –no-cache –no-watchman”